In Part 1 of this blog series I looked at how Stackable and Trino fit in with the wider Apache Hadoop SQL ecosystem and especially with Apache Hive to provide a means of smoothing the migration away from Hive. Now in Part 2 I show you how to get started by building yourself a sandbox environment where you can learn about how all the ecosystem components interact. Being able to build lab environments for learning, development and testing is essential when adopting a new technology into your data stack, and Stackable makes it straightforward to build consistent and reproducible deployments.
It’s no secret that a lot of Hadoop users are paying serious consideration to migrating away towards alternative platforms. Often this plan heads towards cloud deployments, but on premise is still a common choice with many adopting a hybrid approach. Stackable suits all of these approaches and brings the added benefit of being able to use the same software no matter where you run it.
Planning our Hive sandbox
Let’s start with a hypothetical scenario where we have an existing Hadoop installation running Hive and that we want to find a way to migrate away from it onto something new. It could be that the hardware is end of life, that you’re no longer running a version of Hadoop supported by the vendor or that you want to move to a more modern data stack with additional capabilities compared to the existing platform.
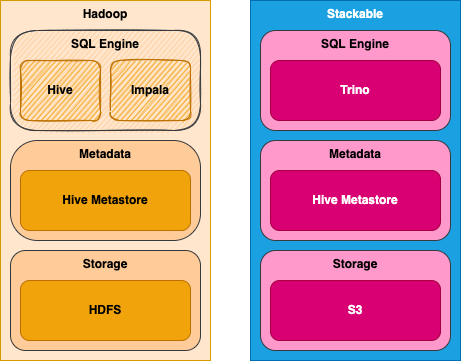
Trino is a core part of the Stackable Data Platform and ships with a Hive connector that can connect to Hive metastore and HDFS on the existing cluster. In this respect you can see it as akin to deploying a compute cluster, with Trino not using the compute resource on the Hadoop cluster (HiveServer2, Impala or YARN) and instead hooking directly into the cluster’s metadata repository and reading data directly from HDFS. Our Stackable sandbox cluster contains Trino plus its own Hive metastore, and Minio to provide S3-compatible storage. We’ll configure two separate Hive catalogs in Trino pointing to HDFS and Hive on the Hadoop cluster and to its own Hive metastore and S3 storage.
Building the sandbox environment
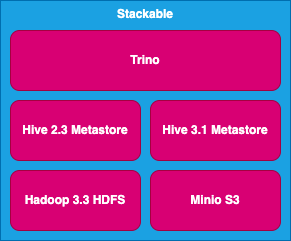
Deploying the data stack and connecting all the pieces together with Stackable Data Platform can be done completely through configuration, making it ideally suited for automated DevOps style deployments. That said, it would hardly be fair to expect the reader to bring along their own Hadoop cluster for this exercise, given the time and the complexity involved in setting one up. We’ll substitute for the Hadoop cluster by deploying a Hive metastore and HDFS using Stackable, effectively having two Hive installations in the one cluster. We will simulate the legacy Hadoop cluster by deploying Hive 2 metastore along with HDFS. In the same cluster we also have a separate Hive 3 metastore using S3 for storage as the target for our migration efforts.
In short our sandbox will contain the following components:
- Hive 2.3.9 metastore with Hadoop 3.3.3 HDFS
- Hive 3.1.3 metastore with Minio S3
- Trino with catalogs configured for each of the Hive metastores
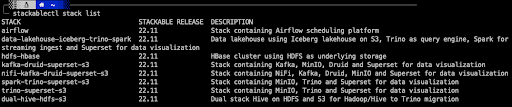
One thing I love about Stackable is how you can easily (with a little practice) create a sandbox environment to play with ideas, processes and tools for tricky tasks like platform migration. To mimic the setup above I created a “stack” that deploys all of the relevant parts of this example installation and added it to our one-line installation tool stackablectl. To get started you can download a binary version of stackablectl for Linux, Mac and Windows from the Stackable GitHub Repo. Just run `stackablectl stack list` and you should see a list of the available stacks; the one we’re interested in is named “dual-hive-hdfs-s3”.
Stackable Data Platform is built on Kubernetes and you’ll need a working Kubernetes environment for this tutorial. If you’re new to Kubernetes the easiest way to get started with is to deploy it inside Docker using Kind. To help you along stackablectl supports creating a Kind cluster for you, so if you have a working Docker installation you can run the following command to build a sandbox environment to play with.
stackablectl stack install dual-hive-hdfs-s3 --kind-clusterIf you are already au fait with Kubernetes and have your own environment or are using a Cloud-hosted Kubernetes service feel free to use that by omitting the --kind-cluster option. You can use the --namespace option to deploy to a specific Kubernetes namespace to keep things tidy. It will take a few minutes for the Stackable containers to download and for service to deploy, no now’s a good time to grab a hot beverage of your choice. If this sort of thing is a spectator sport for you then you can watch the show using your favourite Kubernetes UI.
Personally I like K9s since it runs in a terminal and allows me to keep an eye on my Stackable cluster as it builds.
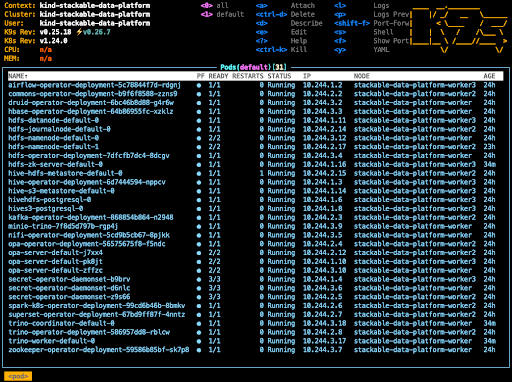
Firstly the Stackable operators are deployed, followed by the application pods. Don’t be too alarmed if you see some errors initially as all of the pods are deployed at the same time and you can expect some of them to be in an unhealthy state while they wait for their dependencies to be deployed. After a short while, all being well, you will have deployed the components into your cluster and all pods will be in the running state.
Our sandbox is now built. Since we’ll be interacting mostly with Trino we should finish off the build by setting up port forwarding to the Trino UI. The following command will allow you to connect to Trino on port 8443 on localhost.
kubectl port-forward service/trino-coordinator 8443:8443If you want to access Trino from another host across the network you can specify that Kubernetes should forward to all interfaces with the following command.
kubectl port-forward --address 0.0.0.0 service/trino-coordinator 8443:8443Connecting to Trino
To do anything useful from here on out you’ll need to be able to connect to Trino. There is a command line interface client available from Trino that makes it easy to connect to our sandbox. You just need to download the executable JAR file and use the following command to connect to the Trino port.
trino --server https://localhost:8443 --user admin --insecureStackable automatically configures TLS for Trino using a self-signed certificate if one is not provided, so we use the `--insecure` option to avoid a certificate validation error. Run this and you should see a trino> prompt. Check to see if the connection is successful by running the statement `show catalogs;` and you should see the following list of predefined catalogs.
trino> show catalogs;
Catalog————–
hivehdfs
hives3
iceberg
system
tpcds
(5 rows)
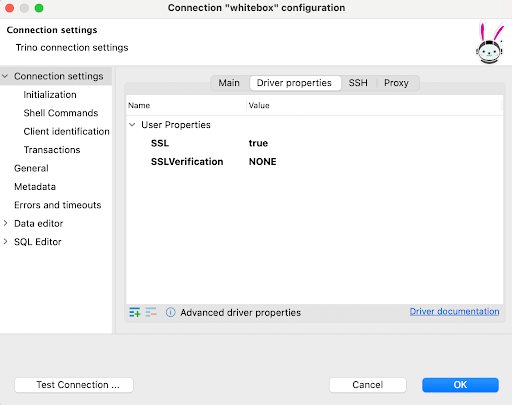
You may want to use a GUI rather than the shell-based client and personally I like to use DBeaver since it has support for a wide range of data sources, including popular big data, SQL and NoSQL databases. Configuring a connection is straightforward.

As with the CLI client we will specify not to validate the TLS certificate of the Trino server. In DBeaver this is done by adding the following driver properties.
Next steps
If you’ve made it to the end and have a working sandbox, well done! At Stackable we try to simplify deploying complex software and we hope we’ve shown how you can bootstrap a sandbox environment for yourself. In Part 3 of this series we’ll start digging in that sandbox and look at some commonly used techniques for transforming and moving data using Trino. Stackable and Trino together provide a solid foundation for migrating data between different platforms and data storage technologies. Stay tuned for some more hands-on examples of what you can do with Stackable.