


Have you ever wondered how to combine structured data from your data warehouse with generative AI? With the latest Stackable release 25.7, featuring Trino 476’s native AI functions and the Stackable Data Platform’s simplified Kubernetes deployments, you can now build a complete LLM-powered analytics stack in minutes.
In this post, I’ll guide you through quickly setting up the excellent project Open WebUI including build-in Ollama with Mistral 7B. We will then deploy the Stackable NY Taxi demo, which uses Trino’s new AI functions to combine structured data with the LLM.
Fair warning:
(1) Even with adequate resources, this is a toy example that showcases the possibilities but runs quite slowly. You may want to grab coffee between queries. For production workloads, especially in the cloud, consider using cloud-based LLM APIs or dedicated GPU clusters for better performance and scalability.
(2) This setup can be run locally or in the cloud, but running it locally requires a robust setup. For local execution, you’ll need a machine with at least 64GB of RAM to run comfortably. Local LLMs are resource-intensive. The selected model, Mistral 7B, alone requires significant memory, in addition to the entire Stackable analytics stack (Trino, Superset, MinIO) running alongside it.
(3) For the sake of simplicity, no GPU support has been configured. Therefore, expect slow performance and potential out-of-memory issues for complex queries.
Prerequisites
Before we begin, make sure you have:
- A fresh Kubernetes cluster (I am using minikube locally, but any supported K8s should work)
- Helm 3.x installed
- kubectl configured (minikube’s kubectl works as well)
- RAM available (have an environment with at least 64GB RAM, you’ll need >40GB of it… see disclaimer above!)
Step 1: Installing Open WebUI with Helm
Open WebUI provides a sleek ChatGPT-like interface for local LLMs. Let’s get it running in our local cluster:
# Add a fresh, new cluster to minikube
minikube start --profile sdpcluster
minikube profile sdpcluster

# Add the Open WebUI Helm repository
helm repo add open-webui https://helm.openwebui.com/
helm repo update

# Install Open WebUI
helm upgrade --install open-webui open-webui/open-webui --version 6.29.0 --wait
Wait for the pods to be ready. After about 10 minutes, you will be greeted with:
🎉 Welcome to Open WebUI!!
 ██████╗ ██████╗ ███████╗███╗   ██╗    ██╗    ██╗███████╗██████╗ ██╗   ██╗██╗
██╔═══██╗██╔══██╗██╔════╝████╗  ██║    ██║    ██║██╔════╝██╔══██╗██║   ██║██║
██║   ██║██████╔╝█████╗  ██╔██╗ ██║    ██║ █╗ ██║█████╗  ██████╔╝██║   ██║██║
██║   ██║██╔═══╝ ██╔══╝  ██║╚██╗██║    ██║███╗██║██╔══╝  ██╔══██╗██║   ██║██║
╚██████╔╝██║     ███████╗██║ ╚████║    ╚███╔███╔╝███████╗██████╔╝╚██████╔╝██║
 ╚═════╝ ╚═╝     ╚══════╝╚═╝  ╚═══╝     ╚══╝╚══╝ ╚══════╝╚═════╝  ╚═════╝ ╚═╝
Once running, you can use kubectl port-forward svc/open-webui 8080:80 to forward the Open WebUI to your local machine. Afterwards you can access the Open WebUI at http://localhost:8080. You will have to adjust the IP if you are using a remote cluster.
Step 2: Installing Mistral 7B via the GUI
Now comes the fun part – getting the LLM running. Although we could have configured this during the Helm installation, using the UI provides more transparency for the purposes of this post. For this walkthrough, we’ll employ the ‘Mistral7B’ model. However, numerous other commercial and non-commercial models are also viable.
Open your browser and navigate to Open WebUI:
- First-time setup: create an admin account when prompted
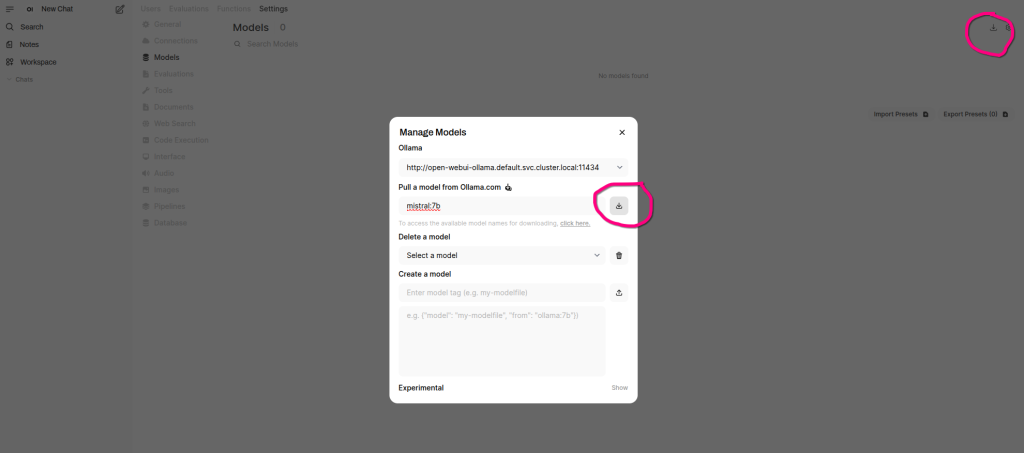
- Navigate to Models: click on your profile settings icon ( bottom-left) icon → Admin Panel → Settings → Models →Manage Models
- Pull Mistral 7B:
- Click “Pull a model from Ollama.com”
- Enter “
mistral:7b" - Click “Pull Model”
- Wait for the model to be downloaded
This will take a few minutes, depending on your internet connection. You can monitor the progress in the UI.
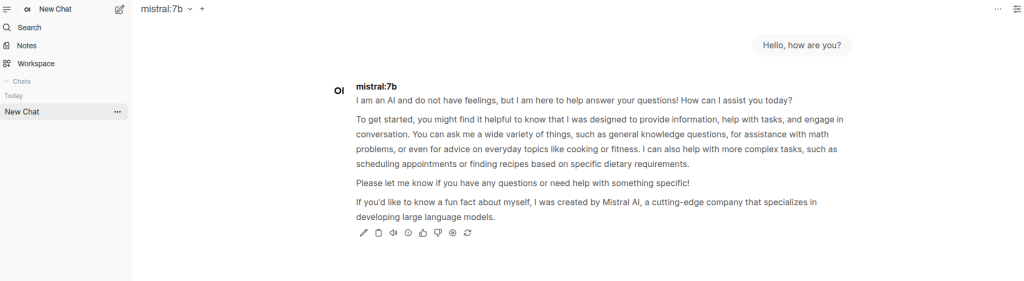
Once complete, you should see Mistral available in your model dropdown. Give it a quick test in the chat: “Hello, how are you?” If it responds coherently, we are good to go.
Step 3: Deploying the Stackable NY Taxi Demo
Time to get some real data to play with. The Stackable NY Taxi demo provides a complete analytics stack with realistic datasets. The demo includes realistic data that is perfect for testing AI functions.
We will use stackablectl – Stackable’s CLI tool that makes (demo) deployments a no brainer:
# Install stackablectl (if not already installed)
curl -L https://github.com/stackabletech/stackable-cockpit/releases/latest/download/stackablectl-x86_64-unknown-linux-gnu -o stackablectl
chmod +x stackablectl
sudo mv stackablectl /usr/local/bin/

# Install the appropriate Stackable operators and deploy the NY Taxi demo
stackablectl demo install trino-taxi-data
This sets up:
- Trino cluster for distributed SQL queries
- Apache Superset for visualization
- Sample NYC taxi trip data
- S3-compatible MinIO for object storage
Once the installation of assets is complete, watch the provisioning process until all conditions show ‘Available’ (you can also monitor the provisioning with tools such as k9s):
stackablectl stacklet list

Everything should be running within 10 to 15 minutes; be patient with the setup.
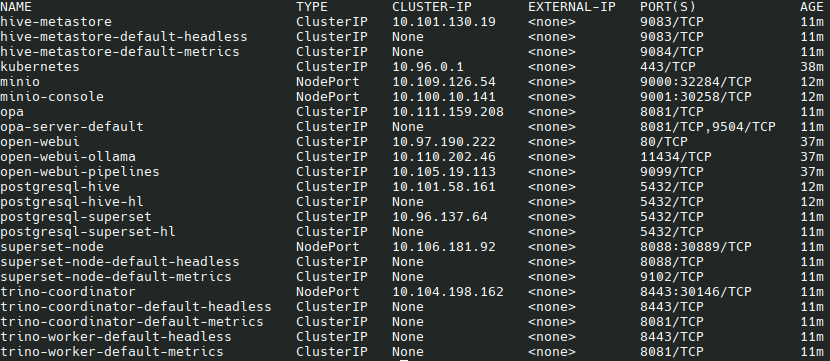
You can see all deployed assets with:
kubectl get svc
Step 4: Configuring Trino with an AI Catalog
This is where it gets interesting. Starting with version 471, Trino introduced AI functions. To use these, we need to configure a catalog to connect to our Mistral model. This can be set up using two YAML files.
Now, create the Kubernetes Secret for the Ollama API key. It is not really used by Trino, but it is still required. Create a file named ‘llm-secret.yaml’ with the following content:
llm-secret.yaml:
apiVersion: v1
kind: Secret
metadata:
  name: ollama-api-key
stringData:
  api-key: "api-key"
Next, create the TrinoCatalog resource (and yes, Ollama works under the OpenAI provider alias). Create a file named ‘llm-catalog.yaml’ with the following content:
llm-catalog.yaml:
apiVersion: trino.stackable.tech/v1alpha1
kind: TrinoCatalog
metadata:
  name: llm
  labels:
    trino: trino
spec:
  connector:
    generic:
      connectorName: ai
      properties:
        ai.provider:
          value: openai
        ai.model:
          value: mistral:7b
        ai.openai.endpoint:
          value: http://open-webui-ollama.default.svc.cluster.local:11434
        ai.openai.api-key:
          valueFromSecret:
            name: ollama-api-key
            key: api-key
Apply both configurations:
# Apply the secret
kubectl apply -f llm-secret.yaml

# Apply the TrinoCatalog
kubectl apply -f llm-catalog.yaml
Wait for Trino to pick up the new catalog configuration:
# Check that the catalog is created
kubectl get trinocatalog

# Wait for the Trino coordinator to be ready
kubectl wait --for=condition=Available trino/trino --timeout=20m
The AI functions will now be available under the llm.ai schema.
Step 5: Testing AI Functions in Superset
Now for the results! Let us access Superset and test our AI-powered queries.
First, get the Superset URL and/or perform a port forward:
kubectl port-forward superset-node-default-0 8088:8088Access Superset, typically on port 8088, with the default credentials from the demo documentation (user: admin, password: adminadmin), and open Superset’s SQL Query Editor.
Your First AI Query
Now, let us create a new SQL Lab query and try the simplest possible AI function. The AI functions are available with the ai schema name, so we will reference them as llm.ai.function_name:
-- Test the connection with a simple greeting
SELECT llm.ai.ai_gen('Hello! Can you say hi back?');
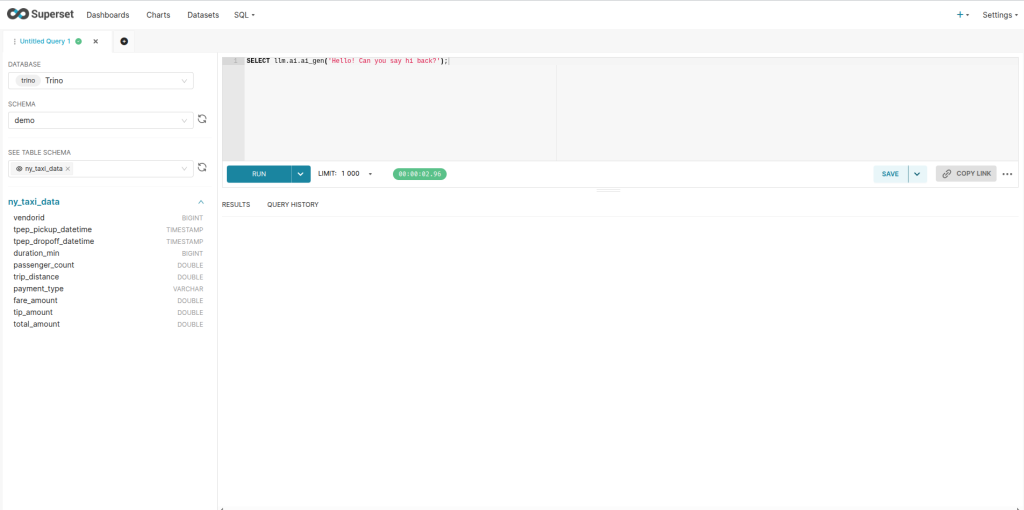
If this works, you should see Mistral respond with a friendly greeting. Now let us connect it to our actual NYC taxi data:
-- Connect AI to our dataset with a simple question
SELECT
  COUNT(*) as total_trips,
  llm.ai.ai_gen('We have ' || CAST(COUNT(*) AS VARCHAR) || ' taxi trips in our database. What does this tell us about the dataset size?') as ai_response
FROM hive.demo.ny_taxi_data ;
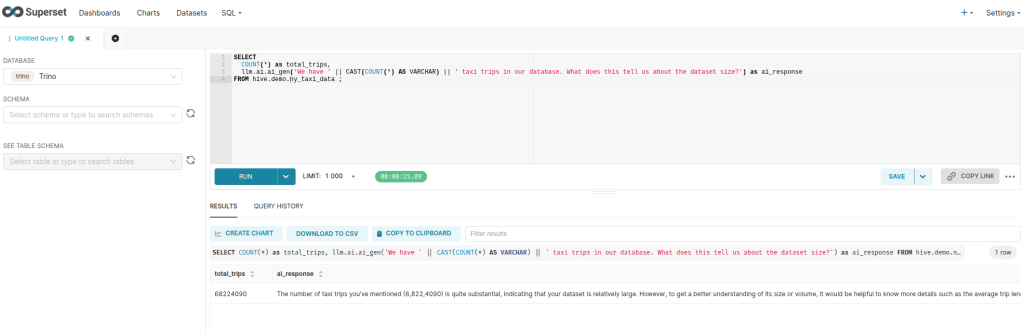
This simple query counts all trips and asks the AI to comment on the dataset size. This is the easiest way to verify that everything is working together.
This query combines traditional SQL analytics with AI classification and insight generation!
Advanced AI Function Usage
Trino 476 includes seven AI functions: ai_analyze_sentiment, ai_classify, ai_extract, ai_fix_grammar, ai_gen, ai_mask, and ai_translate. Here is another example:
-- Generates a brief description of a single taxi trip with formatted distance, fare, and tip amounts and inline-translated to German.
SELECT
  trip_distance,
  fare_amount,
  tip_amount,
  llm.ai.ai_translate(
    llm.ai.ai_gen(
      'A taxi trip covered ' || FORMAT('%.2f', trip_distance) || ' miles ' ||
      'with a fare of $' || FORMAT('%.2f', fare_amount) ||
      ' and a tip of $' || FORMAT('%.2f', tip_amount) ||
      '. Briefly describe this trip'
    ),
    'de'
  ) AS trip_insights
FROM hive.demo.ny_taxi_data
WHERE fare_amount > 0
  AND tip_amount > 0
LIMIT 1;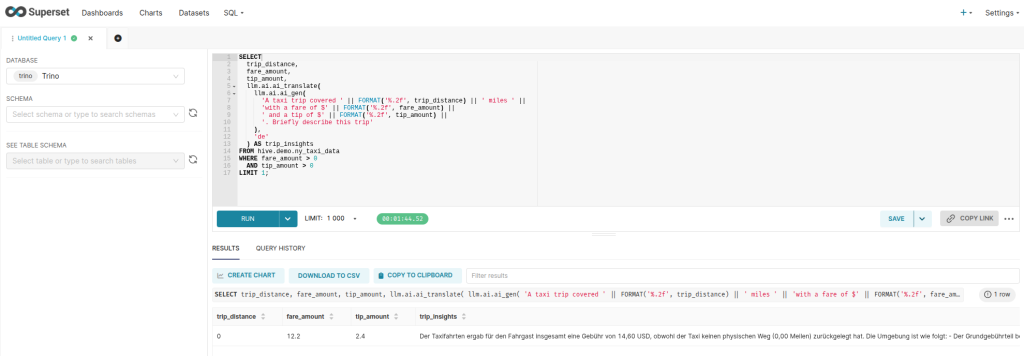
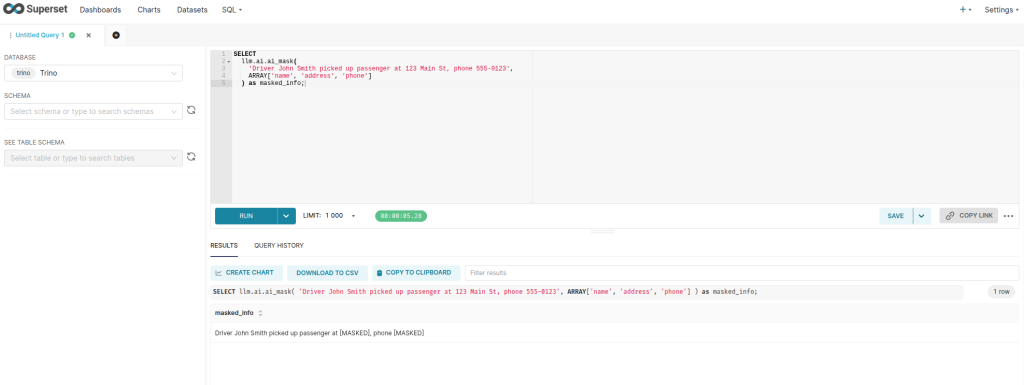
Bonus: Data Privacy with AI Functions
One of the most unsual features is the ai_mask function for privacy protection:
-- Mask sensitive information (mocked data)
SELECT
  llm.ai.ai_mask(
    'Driver John Smith picked up passenger at 123 Main St, phone 555-0123',
    ARRAY['name', 'address', 'phone']
  ) as masked_info;
What We Built
In less than an hour, we have created a complete GenAI-powered analytics stack:
- Open WebUI: Providing a ChatGPT-like interface for our local LLM
- Mistral 7B: Running entirely in our Kubernetes cluster
- Stackable Platform: Managing our data infrastructure
- Trino with AI Functions: Bridging SQL and natural language
- Real Data: NYC taxi trips data for realistic testing
The advantage of this setup is that your data never leaves your cluster. You gain the power of GenAI analytics without sending sensitive information to external APIs.
Next Steps
This is just the beginning! Here are some ideas to extend this setup:
- Add More Models: experiment with different models like Llama, OpenAI/ChatGPT, Anthropic/Claude or other specialized models.
- Add More Data: integrate your own datasets for more comprehensive analysis.
- Use a custom model: with the RAG approach from OpenWebUI, you can easily build a custom model using your own data and connect it with data in Trino.
- Enhance Performance with GPUs: utilize more powerful GPU hardware to accelerate computations and improve performance.
- Create Dashboards: build Superset dashboards enriched with AI-generated insights.
- And more…
Wrapping Up
The combination of Stackable’s Kubernetes-native approach and Trino’s new AI functions opens up incredible possibilities for data teams. We can now combine structured data with the power of generative AI and build truly intelligent analytics workflows, all running on infrastructure we control.
In under an hour, we have successfully built an AI-powered analytics stack using Open WebUI, Mistral, and Trino’s new AI functions, all seamlessly integrated with the Stackable Data Platform 25.7. By following the steps outlined, you have learned how to deploy Open WebUI and Mistral 7B on a Kubernetes cluster, set up the Stackable NY Taxi demo for realistic data analysis, and configure Trino with AI catalog functions to use AI-enabled queries.
Give it a try and let us know what insights you discover in your own datasets!
Want to learn more about the Stackable Data Platform? Check out our documentation and join our community Discord for discussions.